** This blog is still under major design construction. I promise it will look pretty soon. If you attempt to use a link that doesn't work I apologize, I'm working on it. Finally if you see text that is highlighted, I am working on creating a link for it. **
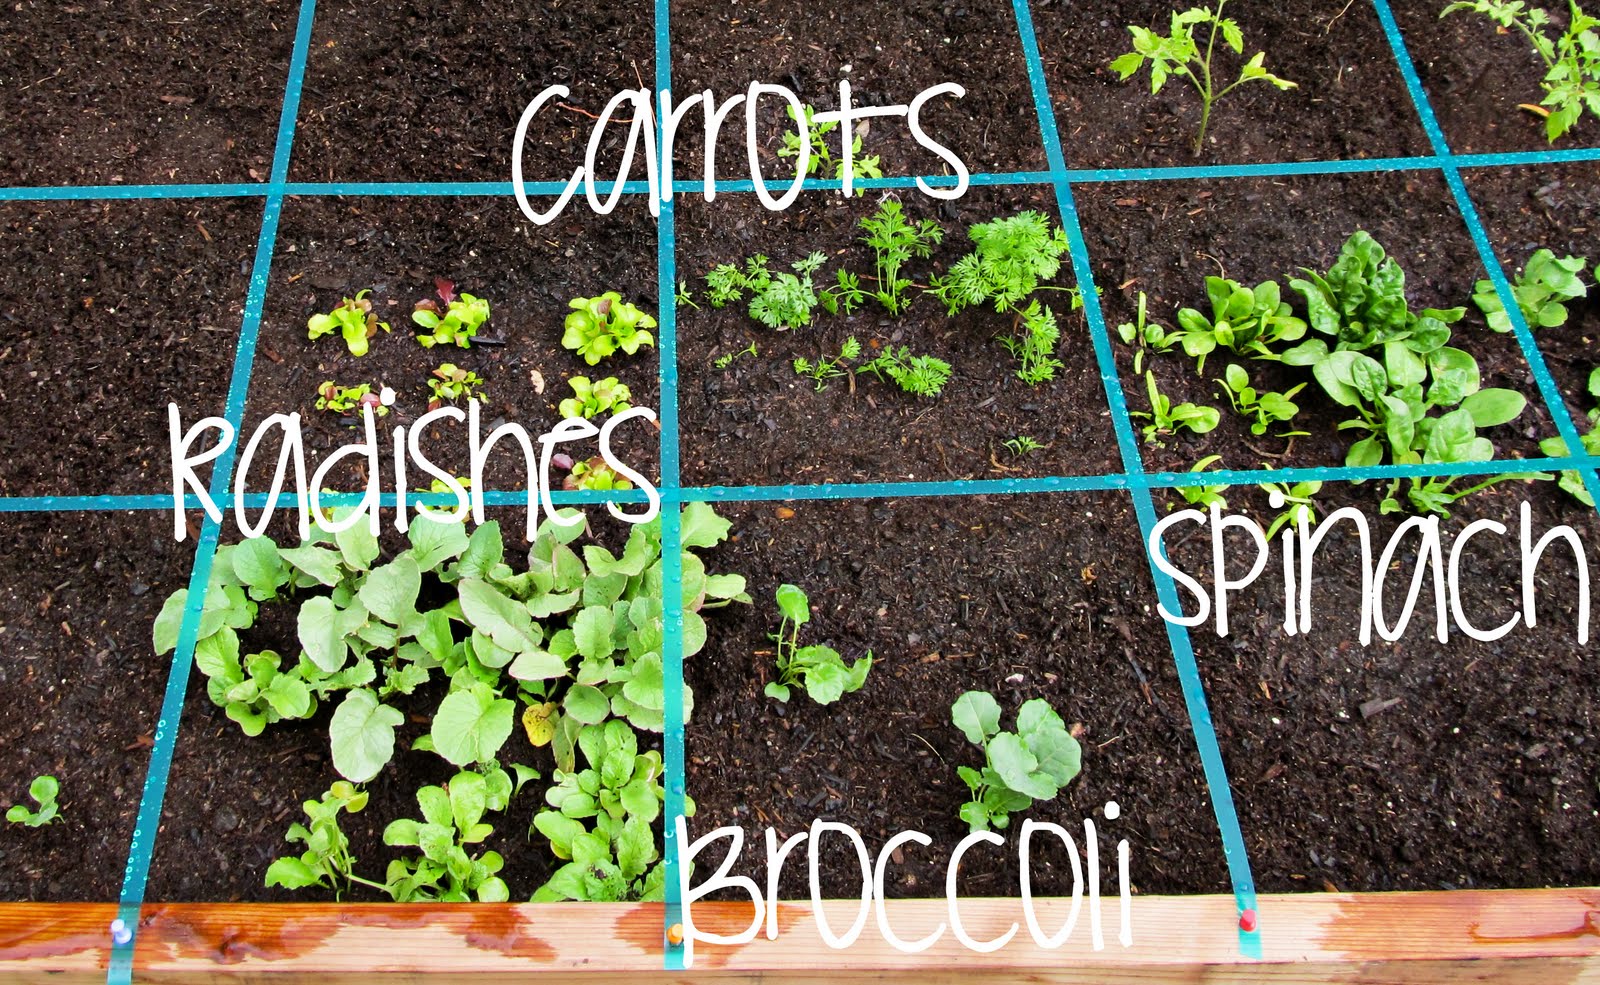
Today is the day I've been waiting for... planting day! My little vegetables plants have sprouted and begun to get too big for the little containers I started the seeds in! Now that my garden bed is built, and filled my little crops are ready for their new home! Because I am using the Square Foot Gardening Method, I used garden tape to mark off each square foot in the bed. My bed is 4'x8' so I have 32 squares to plant in.
I used the garden plan I created at GrowVeg.com as a guide so that I would know where each plant would go, and how many would go in each square. Most of my transplants had developed four sets of true leaves, but some had not, so they weren't ready to be put in the ground.
When transplanting, it's important to wait until the evening, that way, the soil is cooler and can retain moisture for the newly planted roots. My brother and my boyfriend helped me plant until way after dark, but we got it done, and I am so pleased! I think my little bed is just beautiful!
This is how my bed looks now that it's got some green in it.
In the top 8 squares, I planned on planting Bell Peppers, but I am having the hardest time getting them to sprout/grow, they are taking forever, so those squares will stay empty for now.
This was a big step in the whole gardening process, and I'm glad to have it done. Now, my job is fairly easy, just sit back and let them grow!
** Update **
Remember the 4th grade petri dish (aka wet paper towels in a Ziploc container) method I tried? It didn't work. After about two weeks, the only thing that grew was tons of slimey green mold, and the smell was horrible! Tonight I sowed Bell Pepper seeds for the third time... Let's hope something happens!
If you decided to build a Raised Garden bed, rather than buy one, here are the directions I used to build my bed. You don't need to be a master craftsman to do this, and I think these instructions are for the super-beginners. (I did it, and I can't even build a Popsicle stick bird house). Good luck!
Step 1 Purchase Materials Needed
(1) 8 foot long 4"x4" or (1) 6 foot long 4"x4"
(6) 8 foot long 2"x6"s**
(2) 10 foot long ½" diameter PVC pipe (optional*)
(4) 12" long or (1) 4 foot long 1" diameter PVC pipe (optional*)
(32) 3 ½" wood nails
(16) ½" wood screws (optional*)
(8) 1" metal tube straps (semi-circular brackets) (optional*)
* The PVC pipe and ½" wood screws add versatility to your bed. By mounting the PVC pipes inside your bed, you can add bird netting or shade cloth to your bed.
** If you want a bed that is 18" deep, you will need to purchase (9) 8 foot long 2"x6"s.
Step 2 Cut
For a bed that is 18" above ground: cut the 8 foot long 4"x4" into four equal pieces. You should end up with (4) posts that are 24" long.
For a bed that is 12" above ground: cut the 6 foot long 4"x4" into four equal pieces. You should end up with (4) posts that are 18" long.
You will need an extra 6" at each end to anchor the bed into the ground,
Next, take (4) of the 8 foot long 2"x6"s and set them aside. These will become the walls of the length (the 8 foot side) of the bed. Cut the remaining (2) 8 foot long 2"x6"s in half giving you (4) 4 foot long 2"x6"s. These will form the walls of the width of your bed (4 foot side). (If you are building an 18" raided bed, you will need to cut (1) more 2"x6" in half.)
If you bought (1) 4 foot long 1" diameter PVC pipe, cut it into 4 equal pieces, giving you (4) 12" long pieces.
Step 3 Assembly
For easier assembly, build your bed upside down. Set one of the 4 foot long 2"x6" boards on its side (the thin side) on a flat surface (like the pavement or your garage floor). Place one of your 24" posts at one end. Using a vice to tightly hold the pieces together, secure using (2) of the 3 ½" wood nails. Repeat at the other end of the board. Repeat the whole process with another 4 foot long 2"x6".
Using the vice, join the sides with one of the 8 foot long 2"x6" boards and again secure with (2) of the 3 ½" wood nails. Add the another long side. You now have one layer finished! Using the same techniques, add the second (and third) layer of 2"x6"s.
Step 4 Position
With help from a friend or family member, flip the bed right side up and move it to your desired location in the yard. With spray paint, or some other marker, mark where each of the four corner posts will go. Move the bed aside, and dig each post hole 6" deep. Put the bed back into place with each post in its proper hole. Fill each hole with soil to secure and anchor the bed.
If you're not adding the PVC option, your bed is finished! Congratulations!
Step 5 Lining (Optional)
Rake the existing soil, grass, weeds, or whatever is at the bottom of the bed to level it out. If you live in an area that is prone to gophers, moles, etc., line the bed with a 4'x8' piece of hardware cloth that is resistant to rust. Rust resistance is key. If rust gets into your soil, your vegetables are going to taste rusty, eww. Trim the cloth with shears to fit around the posts.
If moles and gophers aren't a problem you may choose to line the bottom of your bed with weed cloth or newspaper keep out weeds. If you're using newspaper, be sure to use about 10 layers.
Step 6 Attaching Pipe
To attach the PVC pipe for bird netting or row covers, attach (4) 12" pieces of PVC pipe inside the bed. On the long sides, right next to each post, screw on (2) tube straps to secure each pipe in place. Insert one end of the 10 foot long ½" diameter PVC pipe into one of the 1" pipes attached to the bed. Bend the pipe and insert the other end into the 1" pipe across the bed, creating an arch. Repeat with the other end. If and when you decide to add bird netting or shade cloth, drape it over the arch and attach with wires.
Well, how does it look? Feel free to send me photos!
❀Journal Ideas! ❀
Now that your bed is made, here is some information you can record in your journal:
Your garden bed's dimensions
Building material used (redwood, cedar, vinyl, metal, stone)
How much it cost to build?
Include copies of your garden plan and any drawings you made of your bed
Recently, I have gotten some comments and e-mails from discouraged followers who would like to start a garden, but have little or no garden space. To them I say, "despair not, for I have answers!" A garden does not have to be an entire backyard setup, it doesn't have to be big, fancy, or look amazing. Essentially, all anyone needs to garden is some dirt, water and seeds. Yep, that's it. In this post I'm going to talk about gardening in small spaces. After reading, everyone will be so determined to go out and start their own little garden!
Where Can I grow?
I dont' know why people thing they need a five acre spread to plant a garden. I think, if there's space to walk, there's space to garden. I'm lucky that I have a backyard, but BF doesn't, he's always wanted a garden but felt discouraged because all he has is a teeny-tiny balcony. I showed him a few tricks, and now, we may as well call him Farmer John. I've read of people in New York City starting gardens on their fire escapes (like Mike), or in window boxes as well. The bottom line is that if you have any space where you can get 6"-18" {deep} of dirt, you're already on your way to success.
Mike from UrbanOrganicGardener.com grew a garden on his 2'x3' fire escape!
Whether you decide to plant on your balcony, in a window box or even on your welcome mat you need to make sure your garden will get enough sunlight for the "crops" you want to grow. Most fruits and vegetables require full sun, but there are some like lettuce, carrots, and raspberries that can get away with a little more shade. South facing areas are best, then comes east and west facing ones. Do you ever notice that the north sides of mountains stay covered with snow long into spring time? Since there isn't enough sunlight to melt the snow on a mountain, try to avoid planting on a north facing area. If it's all you have, well it will do. If you need to, you can go to a home store and pick up some growing lights for about $30.
Old dresser drawers, baskets and miscellaneous boxes and containers help this balcony garden
What can I grow?
Regardless of what people say, everyone everywhere can grow everything. However, depending on where you live, some crops may grow more slowly than others and some may produce more fruit than others. I live in a desert. We have two extremes really hot or really cold. I didn't think it would be possible to grow much, especially in the summer months when temperatures reach 120+ F, but to my surprise, there is a lot that does well here.
To get started, the most important things to know are your Hardiness Zone, as well as your zone's First Frost and Last Frosts dates. Based on these dates, you can figure out when to sow (put the seed in a planting cup), and when to transplant (put the seedling into the ground/dirt). Once you know when to plant, deciding what to plant, won't be difficult.
If you're just wanting to know, "Morgan, what are going to be the easiest, most-fool-proof crops I can plant?" Well, I'll tell you.
Leafy greens: Salad staples like Lettuce, Cabbage and Mustard Greens grow quickly, and you can harvest the outer leaves while the inside leaves are still growing. These greens prefer cooler weather, and will do well with partial sun and a little bit of shade.
Bush Beans and Peas: such as Green Beans grow very well once they emerge as a seedling. Although they don't tolerate cold weather very well, they require little attention.
Green Onions: these babies tolerate a wide range of cool to warm temperatures making them ideal for any planting season/location.
Zucchiniand Summer Squash: These guys are from the same family and are probably the easiest crops to grow. Once they sprout, they grow like weeds, and one plant is enough to feed an entire family, however they need a little bit of room to grow, at least 12" per plant.
Cucumbers: Cucumbers are fairly easy to grow, but they spread out and take up a lot of space. Using a trellis is a good idea to grow them vertically, saving space.
Blackberries: Blackberries grow like weeds, and because they are a perennial, once you plant them, you'll never have to re-plant them. They grow in almost all weather conditions, and as long as they get adequate sunlight you'll have to work to keep them under control!
Radishes: radishes grow from seed to plate in just over two months! As long as they have warm weather, and full sun, these are easy-peasy to grow.
Carrots: Small spaces are ideal for growing carrots. There is usually more shade than sun, and these babies aren't fussy. While they take a while to grow, once planted, very little needs to be done with them.
Raspberries: These berries can grow on a trellis and do well in shady areas.
But what about tomatoes? Tomatoes, although a staple in every garden, aren't that easy to grow. They require some care, full sun, and warm temperatures. In fact, if nighttime temperatures get too cool, the plants will bolt (flower) and they will stop producing fruit. However, for any small space garden, I recommend a small variety of tomato like grape or cherry tomatoes!
Get Creative with Themed Gardens
Since beginning gardening, one of the cutest ideas I've heard about has been themed container gardens. Do you like salad? Great! Plant some lettuce, spinach, tomatoes, carrots, and radish seeds all in the same container! Once it grows, there you have it, a salad garden! For fun, add some edible flowers. They make a tasty and colorful contribution to any summer salad. My favorite edible flowers are violas, marigolds and nasturtiums!
Another themed container garden idea is a Spaghetti garden. Grow a single tomato plant, as well as basil, garlic chives, oregano and parsley. Come harvest time, all you'll need is the pasta! Still in the mood for Italian? How about a Pizza Garden? Tomatoes, peppers, and basil. The simplest of all is an herb garden. These will grow inside or out and don't require much sunlight. I have an herb garden separate from my "big" garden where I grow Cilantro, Oregano, Basil, Sage, Rosemary, Thyme, and Parsley.
Growing Herbs in small spaces can be so cute!
What do I put it in?
"But Morgan, I don't have anywhere to put a bunch of dirt on my balcony/fire escape/window box..."
Small space gardening is often referred to as "Container Gardening." Yea, it's that easy, get a container- 5 gallon buckets are only $2.00 at Home Depot- put some dirt in it and get growing! Containers come in all shapes, sizes and colors. Obviously, flower pots are a good choice, but remember they need to be at least 12" in diameter for most crops. I recently found these at home depot, and of course bought the raspberry and lime ones for my two watermelon plants!
Other common options include, wine barrels, plastic trash cans or storage bins (like the ones from Target in your garage), or planter boxes.
Check out this video from my favorite garden guru at GrowingYourGreens.com
Window boxes are another good option. They can be found at any home or home improvement store and have been good garden homes for centuries.
The Topsy Turvey! While they are a bit gimmicky and a bit cheesy, these work so well for small space gardening. They hang from the ceiling, so as long as there is sun, you dont' need much else. Not only do they grow tomatoes, they grow just about anything (thatisn't a bulb, like onions and radishes, or a root crop, like potatoes and carrots) with a strong stalk, such as peppers, bush beans, pole beans, strawberries, zucchinis, squash, cucumbers, etc. If it grows on a vine, you can grow it in a topsy turvey! Another amazing reason to buy a Topsy Turvey, it is IMPOSSIBLE to over-water the plant inside it!
While writing this post, I discovered another one of John's videos about the Phytopod! This thing is about $65.00, but holy cow, it is amazing. Watch and learn!
Get Creative with Containers
Just for fun, I google image searched "creative small space gardening." Below is just a sample of the glorious-ness I found, and all I have to say is that if they can do it, anyone can do it!
How do I plant the seeds?
Uhh, you put in the dirt and then water it.... I'm just kidding. To be honest when I started my garden, I was a little nervous about this one. Do I just put one seed in each hole, or can I put in more than one?I started all of my seeds in peat cups and put about 2-5 seeds in each one, depending on the size of the seed. Once they sprout, and grow four sets of true leaves, it's time to put them in the dirt... the real dirt, like your container.
I have been using a method called Square Foot Gardening. Established in the 1980's, it was developed to get maximum crops from minimum planting space. Square foot gardening focuses on organic methods including compost, closely planted raised beds/containers, and a small clearly defined garden area. Essentially, the theory is to divide your container into square feet. The size of each crop will then determine how many plants/seedlings you can put in each square foot. For example, one square foot will hold one tomato plant, but another square foot might hold 16 carrot plants.
My 2012 Garden plan with black beans, peas, edamame, green beans, bell peppers, tomatoes, radishes, cucumbers, squash, zucchini, carrots, sweet potatoes, strawberries, celery, green onions, onions, garlic, chives, asparagus, endive, New Zealand spinach, artichoke, broccoli, cauliflower, bok choy, arugula, kale, leaf lettuce, crisphead lettuce, radicchio, Malabar spinach, swiss chard and spinach
When gardening in containers or small spaces, there is a loophole to planting more per square foot than you would think. For example, peas can be grown vertically on a trellis in a container, but you could also plant carrots in the same container, which don't take up much "air space" as they are a root vegetable.
For a list of plant spacing, click this link.
Now, You're Ready
But wait! I have a few side notes you may want to read.
When you purchase your containers, be sure to drill a few drainage holes in the bottom. Otherwise you plants may get waterlogged or grow a fungus.
Because you're growing in a small container as opposed to the large ground, you'll need to water and fertilize your plants more often. Since my plants are still in their growing cups, I'm giving them a decent watering twice daily. Once they go into the ground, they won't need so much. Fertilizing is usually done ever 3-4 weeks. With container gardens I would go every 2-3.
The most important thing in starting any garden is to use good soil. Ideal soil is made of 100% compost or worm castings (poop) with rock dust minerals. Many people are grossed out by the though of making their own compost, so luckily is sold fairly cheap at most nursery's. If full compost is not an option, get a good mix of 30% compost, 30% Vermiculite or Perlite (availableat Walmart, Home Depot or Lowe's) and 30% Peat moss. Ready made planting soils are often a waste of money because they lack necessary plant nutrition, and you end up spending a fortune in fertilizers and soil amenders.
If you want to start a garden but don't want to fuss with watering, or if you are a little forgetful, you could try building a self-watering container. For a variety of different video tutorials, check out Mike over at Urban Organic Gardener. These containers are incredible and so convenient for our super-heated desert climate!
Lately I have really come to enjoy gardening and all of things that go along with it. So what "goes along with it?" To be honest, one of the major benefits, and reasons I started gardening is to save money. I love saving money at the grocery store, but I love getting stuff for free even more. My diet consists mainly of produce, and cereal, with a few rice/chicken/beef/pasta themed dinners thrown in somewhere. Because I eat a lot of produce, I was shopping for it once or twice a week, and spending a fair amount of money.
For example, I eat a salad with at least one meal every day. Typically I buy the pre-cut, pre-bagged stuff. Why? Because If I were to just buy a head of ice berg lettuce, I'm substituting cost for nutrition. Since I'm not willing to do that, I buy the more expensive, ready-to-go, healthier stuff. These bags of lettuce/spinach/mixed greens, etc. cost me close to $3.00 a bag (and I can eat the whole bag in one setting). Even if I don't have a salad every day of the week, and cut out a few days $3.00 x 5 days is $15.00 per week... just in salad! However, I bought a pack of lettuce seeds with 5 different varieties, as well as a pack of iceberg lettuce seeds for $0.75 each. That's $1.50 for a whole bunch of lettuce. It converts to the price of one head of lettuce, plus much more for FREE!
I realize that it takes a few months to grow lettuce from seed to harvest, but lettuce can be grown year round, so once started I'm not missing my salads during the overlap periods. Also, it is important to know a few things about lettuce in particular.
Stagger planting times. I planted 8 plants right at the start, and then planted 8 more about 3 weeks later. This means the plants will all come to maturity at different times, so that when I harvest one crop, I will have more lettuce ready in just a few weeks.
With lettuce, it is smarter to practice "sustainable harvesting." What is this? When it comes time to eat the lettuce, I have one of two options. First, I could cut the entire head of lettuce out of the ground, chop it up, and make a salad. Easy enough, but this leaves me in a pickle for future eating. If I cut the whole plant out of the ground, it won't grow back. It won't produce more lettuce for me to eat in a few weeks. I basically have to start completely over from a seed - which takes months. My second option is to go around each my 8-16 plants and pick 1-2 leaves from the outside of the plant. This will give me 8-32 huge lettuce leaves, plenty to chop up and put into a salad.
** I Challenge You to Save Money **
I know that many people don't have a garden, or an interest in gardening. But like I said, gardening has opened my eyes to other money saving lifestyle changes- like reducing my power bill by 75% ever year. Over the next few months, I will post an easy, inexpensive idea people can do to help them save money. Notice the key words EASY and INEXPENSIVE. The great thing is that I'm allowing an entire month to complete a task. After all the steps are complete, your cost of living will be dramatically reduced! So, if you're interested in saving some serious dough, stay tuned for more!
I quickly decided that trying to plant anything in the rocky-clay-like-Las Vegas dirt wouldn't get me very far in terms of crop yeild, so I decided to build a raised garden bed. I have never built anything in my life, but have always dreamed of acquiring carpentry skills. How hard could nailing some wood together be? After a lot of Internet research, I found that most raised garden beds are about 4 feet wide. This width allows ample growth space, and is a convenient distance for harvesting. At only four feet, most people can pick the vegetables in the middle from either side of the bed without having to reach or strain.
I then surveyed my backyard, and the location I was going to put the bed. Again, most raised beds are between 4-8 feet in length. I had a good amount of space so I decided go with 8 feet. For most vine vegetables (tomatoes, peas, etc.) and other short root vegetables, the raised garden bed only needs to be about 6" tall, but for other vegetables such as medum-long root vegetables and bulbs and tubers (potatoes, onions), your raised bed should be 12" above the ground.
With my city's tough desert soil, I knew that if the roots of my vegetables stretched the depth of my bed, once they got to the bottom, the would have a tough time breaking through, so I really wanted a bed that was 18" high. After council from my parents I decided to start with a 12" high bed, to save money, and to work from there. If I still needed more height, I could always add on. Tada! I now had dimensions!
Next, I drew out my plan and made a list of all the supplies I needed to purchase.
{Click to see the actual write up!}
When building a raised bed it is important to use redwood or cedar because these woods are rot resistant. I used redwood for no other reason than I couldn't find cedar wood anywhere in my city. At my home supply store I noticed that Douglass fir was much less expensive, but if I had gone this route, I would have had to replace my bed every 3-5 years due to the wood rot caused by watering.
Originally I purchased wood screws for my bed, however they were so long, and the wood was so strong, that I quickly realized this was a mistake. The screw heads were being stripped by my power drill before they could get more than an inch into the tough wood. After "screwing" up two screws, I returned them and purchased old fashioned nails. The process was much quicker and easier too.
My brother also convinced me to buy "One of those things the mob guys use to break people's jaws." Surprisingly the man helping us knew exactly what he was talking about, "Oh a vice! Those are in isle 6." We bought a small one that cost about $11, and let me just say, it was the best thing we could have done!
My carpentry skills are still slim to none, and my bed may not look so great to someone with wood-working-experience, but to me it's perfect!
** Update **
After filling my bed with my soil mixture, I decided I did want it to be 18" above ground. So I went back to the home supply store and bought (3) more 8 foot long 2"x6"'s.